Wednesday, August 31, 2016

Series: Colorizing 3D Prints #11 - Top Coat Success!!!

Update:  I am seeing mixed results and I think it may have to do with how long an object has been drying or the use of a primer.  It's not bad; but, I see some smearing on the piece that was primed.  It could be that the primer does not absorb the dyes as completely as the ABS-R.  We'll keep testing and let you know.
It was absolutely necessary to find a clear top coat that would prevent the alcohol marker dyes from running and perhaps ruin some one's clothes, etc.  So, I have scoured the Internet for possible solutions. Little did I know that the solution was right in the little box that I carry with me when I take a 3D printer on the road.

I do want to thank the Krylon support team for going the extra mile in trying to help me find a suitable Krylon top coat directly over the alcohol markers.  Unfortunately, their experience was the same as mine even when using water-based varnish.

However, that does NOT mean that Krylon or any of the other top coats that I tested cannot be used AFTER a first coat of something else has been applied FIRST.

Remembering that all of our ZCorp Z450 full-color powder printer parts are finished by dipping them in a glue that most of us generically know as "Super Glue", I decided to try to coat a previously painted surfboard with some super glue I had in my workbox.

While I now believe that any "Super Glue" could be used, I tested Loctite's Super Glue Ultra Gel in the mini tube.  It was applied using a Q-tip.

NO SMEARING!!!!

I then waited for it to dry and applied a coat of Tamiya Clear Coat (TS-13) to see if the glue protected the alcohol colors underneath.

NO SMEARING!!!!

Here is the result.

Alcohol Colors Coated With Loctite Super Glue (Gel)
As you can see, the Q-Tip did pick up some residual surface color; but, not enough to cause any smearing whatsoever.  Both Spectrum Noir and Sharpie pens had been used for this colorizing test.  And, neither brand showed any signs of smearing.

While I think I could have stopped at the super glue coat, I decided to try spraying the piece with a top coat that had previously smeared the colors in earlier tests.

As you can see, the surfboard survived BOTH top coats.

I am VERY, VERY happy!

A lot of what I hope to do with 3D printing from a craft point of view comes under the general category of wearable art.  Had I not been able to find a way to prevent the colors from being activated by accident, such as a drink spill, that would ruin a person's clothing, it would have prevented me from using the colorizing methods that I'm enjoying so much and life would be a lot harder.

So, this is a big breakthrough in our colorization tests. A really big breakthrough!

Tuesday, August 30, 2016

Series: Colorizing 3D Prints #10 - Primer Success!

This is the image from the last post showing the starting place for today's result.  The previously painted surfboard (printed on an M3D Micro in ABS-R) had been cleaned using an alcohol pad, sanded a bit using a Dremel Flap Wheel sanding tool and coated with Tamiya Fine Surface Primer. 

Primed Surfboard

It was left overnight to dry and then painted with Spectrum Noir and Sharpie alcohol markers using the Craftwell eBrush.  Here is the result.

There is no overcoat.  Yet, there is a sheen to the finish that gives it quite a nice look!  I'm VERY pleased.

Three different pens were used for the red.  They were DR2, DR4 and DR5.  In the Spectrum Noir color system the "DR" indicates the basic color "Dark Red" and the numbers from 1 to 7 indicate lightest to darkest shades of the basic color.   This makes shading and blending incredibly easy!

Spectrum Noir Color System

The entire surfboard was coated with DR2, the lightest I have, and then rimmed first with the slightly darker DR4 and finally with the DR5.  Blending with the eBrush is just a matter of practice.

Due to the poor lighting it's difficult to see the transitions; but, they are there and being able to closely blend colors is a distinct value.  Again, I am VERY pleased.  I have been shooting for this exact result!  Even the masking is better!

So, we are on the right track.  Colorizing 3D prints is not only possible; but, highly successful when using the eBrush airbrush system with alcohol markers.  While it definitely works directly on the print, using a primer has a very positive affect on the outcome.

Even so, I will continue to try to find an overcoat that will not smear the alcohol inks.  It may be that canned sprays cannot be used due to the propellants used.  But, there is a siphon adapter kit for the Craftwell airbrush which expands the overcoat possibilities.

eBrush Observations

I have been extremely pleased with how quickly I was able to gain experience with using the eBrush.  The secret seems to be to move at the elbow rather than the wrist.  And, to move from off of the object onto the object.  Over spray has not been a problem.  For the surfboard, it was confined to about 1-1/2" inches around the object.  So, I have felt very comfortable just painting against an 8.5" x 11" piece of paper.

The best part is that you just pick it up, install a marker and start painting.  There is the option to use the siphon adapter kit, which is the next step in the learning curve, it is not necessary for basic colorizing.  I can't imagine an easier system to use for this application.  I love it!


Monday, August 29, 2016

Series: Colorizing 3D Prints #9 - Clearcoat is Doubtful

While I have not entirely given up on finding SOMETHING to coat a 3D object colorized with alcohol markers using the eBrush, things do look a bit bleak.  Everything I have tried so far has ended up reactivating the colors and making them run.

But, like most quests, trying to find a clear coat AFTER the painting has moved me farther along in the journey to learn more about the process of colorizing 3D prints.  Perhaps we are going about this in the wrong direction.  If, in fact, trying to add gloss at the tail END of the process is not working out, then perhaps, we need to focus on the FRONT end of the process.

So, now I turn my attention to preparation before painting... whether that be sanding or other smoothing techniques or finding THE best undercoat.

Based on one quick test, focusing on preparation looks a LOT more promising.  While any colorization has benefits, a combination of techniques might be even more beneficial and there is only one way to find out... testing. 

Of course, it will take some time to ascertain how the alcohol colors behave over time when applied to a primer or other undercoat, like glue or even fingernail polish.  We're off the trail here, so even the wildest of ideas is not out of bonds.  I have workhorse printers and plenty of filament so it might be fun to run down a few rabbit trails in search of our goal.  :)

The honor of the first complete test goes to Tamiya Fine Surface Primer.

Tamiya FINE primer
For this test, I have used a previously painted part.  The bulk of the color has first been removed using an alcohol pad.  And I have used a Dremel tool called a Flap Wheel to sand the piece to a smoother finish.

Dremel Flap Wheel
The flap wheel was chosen because it was thought to be less likely to gouge the 3D printed piece and it seems to have been helpful.  The Tamiya Fine Surface Primer was then applied.  Here is the result.

Primed Surface
The primer appears semi-translucent, with the residual color from the original paint visible under the primer.  The surface appears to be much smoother than before it had been sanded using the flap wheel.  It also has the slightly glossy look that I was hoping it would have.

It's been about 6 hours since the primer was applied.  But, I'll let it dry for 24 hours before applying the alcohol markers with the eBrush. I'll report the result in a new post.  But, it really look promising!

UPDATE #1 - Fingernail polish (No)

Add clear fingernail polish to the potential top coats that reactivate the alcohol colors causing smearing.  Life is tough.  :)

Saturday, August 27, 2016

Series: Colorizing 3D Prints #8 - Alcohol Marker Airbrush is Very Forgiving

I'm back again with the same surfboard that we had painted, ruined, repainted and ruined again trying hairspray as an overcoat.

The hairspray, unfortunately, was also alcohol based.  So, like Edison did so many times before he discovered the lightbulb, I have another failure under my belt so you won't have to even go there.  Forget Krylon Fixtif and forget Sebastian hairspray.

The good news is that using alcohol based markers, applied using the eBrush air brush, is a remarkably forgiving process when used on 3D printed plastics.  This time, I dropped the surfboard into a bowl of alcohol in an inexpensive Harbor Freight ultrasonic cleaner and was able to get rid of the most recent smearing caused by the hairspray.

It was interesting to learn that the original dye WAS permanent, if slightly washed out.  This tells me that the longer the marker colors sit on the surface of the 3D printed part, the deeper the dye is absorbed.

Once mostly cleaned, as apposed to absolutely cleaned, the result was a surface that could easily be repainted with new patterns.  Here is the result.  Again, the part is small and the contours make it a bit difficult for my inexperienced hands to apply masking with anything close to perfection. 

3rd Paint Application
This actually was a better result than my first attempt to fix the smearing from the Fixatif disaster.  What is really remarkable is that the red color, overall, is a lot smoother.  I don't know if this is due to the fact that some of the red dye had been absorbed uniformly or maybe I'm getting the hang of using the eBrush a bit better.

I do know that I'm not only getting more comfortable using the eBrush; but, genuinely loving it.  It is really satisfying to see a monochrome 3D print become something truly noticeable as color is applied.   This is downright fun!

And, the fact that it turns out to be so forgiving is icing on the cake.

But, painting isn't the only way to use 3D printing for craft projects.  I've had some great success at creating my own stencils and embossing folders!  More to come... MUCH MORE!!! 

Thursday, August 25, 2016

Series: Colorizing 3D Prints #7 - Count Out One Clearcoat!

I would like to find a clearcoat that I can use over alcohol marker colors with my 3D prints.  Failures are as important to experimentation as is success.  And, my first attempt was an epic fail.

Krylon Workable Fixatif  - FAIL!

I picked up this brand primarily because I happened to be in a craft store and it was the only clearcoat I could find.  Plus, the description on the can sounded somewhat promising to a person longing to hope for the best.  (The ability to exercise denial is a family trait!)

But, it didn't take long to find out that Fixitif is NOT the right product for the job unless you want to use it as an uncontrolled 'blender'!

Krylon Fixatif - Color Smearing Alcohol Marker

What a mess!

But, the great thing about 3D printing is that I an easily print out another object and start over.  But, it gets even better than that.  It turns out that it isn't all that difficult to repair the damaged paint job by first cleaning the piece with a paper towel and 91% rubbing alcohol and then repainting.

That latter is not perfect; but, it's certainly 'good enough' in a pinch.

Put aside my poor masking alignment and take a look at the very same surfboard that I cleaned and repainted in about 15 minutes.

Repaint After Cleaning Up Fixatif Smearing
There is still some residual bleed from the clearcoat attempt.  But, it isn't a total loss as it looked to be right after the Fixatif application.

So, the experiment contunues with new things to learn with each step forward.

Epic Success

My granddaughters were by here yesterday and I was able to show them the eBrush and the Spectrum Noir markers.  They each have their own unique artistic interests; but, both had a blast trying our the eBrush and experimenting with blending the Spectrum Noir colors on paper/  Yep.  Christmas is going to be easy this year.  I thought they would like both; but, my watching them have so much fun just confirms that these would be great gifts for them!


Wednesday, August 24, 2016

Series: Colorizing 3D Prints #6 - Markers as Long Term Investments

I am thankful to Craftwell and the eBrush airbrush system for changing the way I view markers... and, in a real sense, opening up a whole new creative world to me.   Craftwell doesn't make markers; but, by including four Spectrum Noir markers with the eBrush, they did introduce them to me.

Before coming across the Spectrum Noir series of markers, I'd always thought of markers as expendable tools that one used and then discarded. 

But, I now view the Spectrum Noir markers quite differently.

Refill & Refresh

The reason for this shift in perspective is that with the Spectrum Noir marker pens we are not only able to refill them; but, we can also swap out the original nibs with replacement nibs.  Moreover, the nibs that we select for replacement can be a different type than the ones that come with the original marker!

To me, being totally unfamiliar with this concept in markers before the eBrush experiments, my ability to view marker tools as long term investments is like discovering a whole new technology!

Coloring Course

 What is really remarkable is that knowing that the markers can be a long term investment also changes how I view USING the markers.  I have always had permanent markers laying around that I used for various small tasks.  But, I never really considered the fact that I could do way more with them if I wuld just invest some time in learning more about how to use them.  They were simply utility items, not artistic tools to me.  Again, all that has changed with my exposure to the Spectrum Noir markers.  If they are of MECANICAL long term value, then they can be an ARTISTIC long term value.

The great news on this front is that the people that make the pens have also designed a free online course in how to use them!  And, beyond that there are many excellent YouTube videos by individuals that use the markers that have been extremely helpful to me.

Personally, I plan to give a set of these markers as gifts this Christmas to the artists and budding artists in my own family.  The fact that they can then take an online course in how to get the most out of them adds great value to that gift.  They are going to love it!

Investment vs. Expendable Offers Wider Choices

The reason why I pursued the Spectrum Noir series of markers in the first place was because four were included with the eBrush.  So, my focus is on their alcohol based line of pens.  Some of the people in my family to whom I plan on giving a set of pens are also 3D printer users.  But, in the same home there is another prospective recipient that is probably more exclusively interested in the 2D arts.  She would probably appreciate watercolor markers more than permanent markers.

Normally, the idea of buying two different kinds of sets of markers, having roughly the same color sets, would be a silly idea to me.  But, when viewed as long-term investments in a lifetime of artistic expression the concept makes perfect sense.  So, this Christmas a single household will find two sets of two differently based markers under the tree.  And, I am excited about that.

It's Wonderful to Be Introduced to New Worlds at ANY Age

Sometimes life is like a rolling snowball in a cartoon... a small experience just keeps on growing bringing with it new ideas and possibilities.  I feel that way about this 3D coloring project.  I simply wanted to add value to 3D prints by being able to colorize them.  But, that not only opened a whole new door for me; but, potentially, for other members of my family!

And, that makes also makes me excited about a new line of products that Spectrum Noir is launching on August 30, 2016... Spectrum Noir Colorista.


The Colorista line is described like this:
Spectrum Noir Colorista is a collection of alcohol markers, wax-based colored pencils, paper pads & card-making kits designed specifically for enthusiasts of adult coloring. We’re bringing you the highest quality coloring pads, including colorable foils and glitter, complemented by an array of tantalizing coloring pencils and alcohol markers to take your coloring to the next level!
Now, THAT sounds like FUN!   I certainly plan to watch!!!

When I look back over my life I see one long series of very cool opportunities and experiences that seemed to have evolved one after another.  And, I can already see that becoming acquainted with the eBrush and Spectrum Noir is another one of those pivitol moments that ensures that life never becomes boring.  I love it!!!

Thank you Craftwell!


Saturday, August 20, 2016

Series: Colorizing 3D Prints #5 - Darker Skin Tones

While I do not believe that I have the proper colors to produce all the skin tones to match the facial characteristics of the cadets that I teach, I do have a wide enough range to at least experiment with slightly darker skin tones.  And that is a logical progression from lesson #4.

Here is the result using the pens available in the Spectrum Noir"Pale Hues" color pack.  The newly colored print is on the right.
Facial Tinting Compared
As you can see, using the exact same colors that were used for face #1, by changing the relative mix we can come up with a strikingly different and pleasant result.  It is also important to note that the face on the right was printed in M3D's ABS-R, not to be confused with regular ABS.  So, we now have at least two surfaces that take the Spectrum Noir markers used in the eBrush airbrush system!

As always, there were new lessons to be learned in the process of colorizing our 2nd face.

Mistakes Are Not Fatal

The first is one that we repeat over and over to our 3D printing students... "Your failures are not final!" 

While it can be difficult to simply touch up a piece if we spray too close or at too high an air pressure that causes blemishes, it is very easy to clean off the color for a fresh start.  To do this simply use a simple alcohol pad.  I ended up having to start over twice.  But, cleaning the piece was very quick and the paint process, itself, is relatively quick.  So, I didn't feel frustrated by the restart.  It was simply a second (and third) chance to do better, learning from the reasons behind the blemishes.

I don't know how long after the marker dye is applied that cleanup can be done so easily.  I suspect that the longer it stays on the 3D printed part, the more likely is dyes the piece.  But, if the alcohol pad is used right after the color application it is very easy to remove it and start over.

Some Masking Techniques Are Better Than Others

One of my goals in this step of the process of learning was to assess different methods of masking.  Three different techniques were used.
  • Liquid Masking
  • Frisket Film
  • Artist's Tape
Liquid Masking

The first product I tested is FineLine Masking Fluid Pen - Supernib Fine Tip.

FINELINE Masking Fluid

 It has a needle applicator and I used it to mask the hair, eyes and mouth while painting the face.  I worked quite well for those applications.  But, it takes quite a while to dry enough to be able to commence spraying.  Once the painting is done, it's very easy to remove.  I can see using it for masking very small depressed features; but, for most masking needs it isn't the best choice.

Frisket Film

I had high hopes for Frisket Film which is heavily used in the craft community for a wide variety of coloring techniques.  It's a very thin film with a light tack backing.

However, in practice, I found it less than impressive for this particular colorizing project.  The tacky back doesn't seem to stick as well to plastic as it does to paper.  And, while it should cut very easily and cleanly, that was not my experience thus time.  I may be that I need a new set of blades for my Exacto knife.  So, I'm not dismissing out of hand; but, the tape actually was a better choice this time around.

Artist Tape and/or Grafic Tape

This class of tape is available in a wide variety of colors and widths.  
Masking tape for artists start 1/8 wide abd can typically be found in widths between 1/4" to 1".  Chartpak's graphic tape is available in much thinner widths, such as 1/32".  Years ago eve art store carried these tapes; but, you may find that your local store doesn't carry the smaller widths.  However, they are available online.  For now, I have 1/8" and up.  But, I definitely want the smaller widths as well.

For me, the most reliable making technique continues to be artist tape.  While I have some blue masking tape in 1/8" and 1/4", I prefer tape specifically labeled "Artist Tape" or "Drafting Tape'.
 
Conclusion

I am thoroughly enjoying experimenting with the eBrush and especially enjoy using it with the Spectrum Noir markers.  While I certainly am still in the novice category, I am becoming more confident with each new experiment.  There is no question that the investment is worth the time and money that it takes to get started,  There is no comparison between a monochrome print and a colorized print when it comes to perceived value and aesthetics.  Even the slightest amount of coloring makes a difference.

My next project looks at creating custom designer buttons using M3D's ABS-R, the eBrush and Spectrum Noir markers.

Thursday, August 18, 2016

Series: Colorizing 3D Prints #4 - Colorizing a 3D Printed Face

This afternoon, I was pleased to hear my wife tell me that I'd just gotten a package.  I've been waiting for more Spectrum Noir markers to arrive and they are now here.

This gives me a set of markers that can be used for flesh tones and I was anxious to try them out.

I decided that the most appropriate test for our purposes was to create an object that the cadets are more than capable of designing.  Essentially, it is a face that is created using different levels of extruded areas.  The nose is a simple sphere.

Face - Extrude Construction
I printed the object in both ABS-R and Tough 3D Ink on an M3D Micro 3D printer.  I rightly uspected that Tough 3D Ink, being softer and flexible might take the marker dye a bit more smoothly when blending colors.

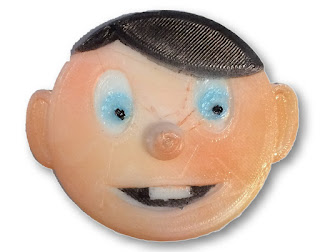
While my skills at using the eBrush airbrush are at the most crude level, it is plain that coloring the object does, indeed, add value to it.  In person, the object looks a LOT better than the photo.  The marks and flaws are less evident and so is the 3D printing pattern in the hair.

Here is an iPhone photo of the colorized face:

Colorized M3D Tough 3D Ink Face
90% of the face is flat.  Only the nose is not flat.  So, all of the appearance of shading and contouring is done with the eBrush using different colors and distances.

As I have stated before, I am no artist.  And, I've only had about 30 minutes total working experience with the Craftwell eBrush system.  So, I am extremely pleased with this result.  I will attempt the ABS-R version tomorrow.

Quick Observations

It is important not to apply too much color at any one time.  And, I find using a lower air speed better than using a higher air pressure.  I believe that this is because the markers are intended for paper and the dye does not absorb into the plastic as it does with paper.  A high pressure, therefore, can actually blow around the undried dye and create patchiness in the color.

Aiming is still an issue.  It's important not to use the marker direction as our guide.  It is the pen, itself that must be pointed at the working area.  This really takes some constant attention.

I really love the Spectrum Noir markers.  They work beautifully with the eBrush.  So far, I have only attempted to use the wide end of the pen; but, I am told that the pointed end can also be used.  I have also learned more about the Spectrum Noir system.  Not only are the markers refillable; but, the nibs can be replaced.  So, the markers are not the typical use and discard markers that most 3D printer folks have used.

Masking is an absolute necessity.  I used tape cut with an Exacto knife.  But, I think I want to experiment with creating 3D printed pieces to accomplish the masking task.   Thus I would have a 3D printed piece that each feature while the others would be printed.  Moment of Inspiration lends itself to doing this task very, very well.  More on this later.

Lastly, while neither the eBrush nor the Spectrum Noir markers are intended to be used with 3D printed materials and there are some drying and blending issues not found with paper, the potential for adding value is great enough to continue to test and experiment.  Permanency is still a question; but, that is true for standard watercolor painting as well.  We're trying to find a safe clear coat to help with that issue.

In summary, here is a side-by-side comparison of the plain white print in M3D's Tough 3D Ink and the colorized version.

Plain & Colorized Face Compared
Yes, it's going to take effort and a fair amount fo practice to increase our skills; but, even relying on a bad iPhone image, there is no question which one is the most pleasant to enjoy and appreciate.


Series: Colorizing 3D Prints #3 - Creating Stencils

While waiting on the additional Spectrum Noir markers to arrive, I thought I would explore a slightly different aspect of 3D printing and colorizing... creating stencils that can used with the eBrush and other coloring techniques.

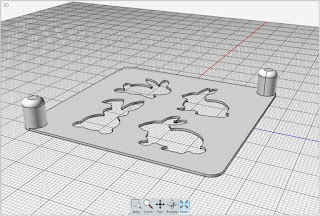
As a sample, I created a small template, using Moment of Inspiration, that features four bunnies.  It could not have been easier.  In fact, I find the line drawing tools, that I used to create the bunny cutouts to be far easier to learn to use than those in 2D applications like Inkscape.

3D Created Stencil Design
As printed, being a first test, it's rather small.  It's just 60mm x 60mm.  However, since 3D images are easily resized either in the design application or in the printer's software, it is readily scalable.  Once it's designed it can be printed up to the maximum size allowed by the 3D printer.

A feature of this stencil that isn't common to off the shelf stencils is the inclusion of handles on two corners to aid in placing and removing the stencil.

Since I simply laid the stencil on the test page and did not hold it down tightly, there is some slight softness on the sprayed result.  I used a TB8 blue Spectrum Noir pen with the lowest setting on the eBrush.  Here is the result.

Bunnies Created with 3D Printed Stencil
Obviously, I would have made sure that the overspray outside of the stencil was masked if I were doing this in for a finished project; but, since this is merely a test to show the concept, I simply laid the stencil on the paper and fired away with the eBrush.  Also, since the bunnies are relatively small, I didn't bother trying to feather the colors, etc.

I also printed the stencil with the ABS-R material in the printer at the time of printing.  And, I used the lowest resolution settings for the print job.  I think I would probably prefer to use a flexible material, like M3D's Tough 3D Ink and print it at a higher resolution with subsequent stencils.

Unique Capabilities of 3D Print Stencils

A Unique Feature of 3D Printed Stencils is that we can bridge gaps without obstructing the ability of the eBrush to reach every area.  Suppose, for instance that we wanted to create a companion stencil that permitted us to print a border around each bunny.  With a 3D printer, we can create bridges that hold a 'mask' that blocks the spray for the main bunny and keep that mask in place using 3D printed bridges in the form of arches that provide enough room underneath to allow the spray to fill the new stencil gaps.  In this case, it's probably best to use a hard ABS-R or PLA material to create the mask.

Border Stencil with 3D Printed Connectors

In this case, we could lay this second stencil right back on top of the position of the first stencil and use it to spray a black border around each bunny!

While a border is the simplest application of this capability it goes well beyond that.  As we move forward with colorizing 3D images, we'll see that we can create 3D contoured masks that wrap around our 3D printed objects.  I can envision an unlimited number of masking techniques that are made possible by 3D printing... especially when using flexible materials as the mask!

The more I ponder the merger of the craft arts with the 3D printed arts, the more excited I become about the benefits to both!

Tuesday, August 16, 2016

Series: Colorizing 3D Prints #2 - First Try

As I said, for better or worse, you will be along for the ride as I explore the concept of colorizing 3D prints with Craftwell's eBrush airbrush system.

Before I post an image, I need to remind you that (1) I have never done this before, (2) I do not have have all the Spectrum Noir pens that I need to do this right (And, yes, I now know they work  the best!), (3) I'm old and my eyesight is probably not as good as yours and lastly (4) the local art supply store was closed by the time I got by so I am using the wrong masking tape.

What do I think?

 Well, aside from all the caveats above, I'm absolutely sure I'm on to something good.  While it clearly makes a difference which markers you use, the overall experience is a LOT of fun and the eBrush perferms just as I'd hoped.  The major problems I ran into involved using a set of markers that were locally available that (1) did not flow as well as the Spectrum Noir and (2) tended to dry too slowly and run.  You can see this on the light switch plate.  The dark blue and red were the Spectrum Noir.  The black and gold were Sharpie Fine Point, which worked well and the lighter blues were Chartpak AD, which I will be glad to leave behind.

The First Attempt

I decided to try something that would take a minimal of color feathering for this first try.  The goal was to create a custom light switch plate for a person that liked to surf.  So, a white plastic light switch plate was painted to roughly simulate the surf.  (Roughly being the operative word!)  And, a surf board 90mm x 20mm was created in Moment of Inspiration, printed on an M3D Micro in white ABS-R, colorized using the eBrush system and glued to the light switch plate. 

For better or worse here is my first try,

Airbrushed 3D Print / Light Switch Plate
First, let's talk about the switch plate coloring.  The dark blue Spectrum Noir worked exactly as I had hoped.  I used a piece of torn paper as a mask to simulate the waves.   But, since the dark blue was the only blue that I had from Spectrum Noir, I picked up some lighter blues in the Chartpak AD line.  Things fell apart fast.  It was tough getting the correct spray and then I ran into the problem of running and splotching.  Even so, the affect was modestly successful for a first attempt.

As for the 3D printed surfboard, it's obvious that I need to do a better job of applying the masking tape.  Some of that has to do with the only tape I could find this evening, which was actually intended for fabrics.  The tape didn't exactly handle the contours all that well and there was some color bleed under the tape.  I know I can find better tape at the art supply store.

The Red Spectrum Noir was a dream to use.  But, some of that was probably because I cheated and sprayed the whole thing solid rather than attempting some color feathering.  It dried very quickly. 

The black and gold Sharpie also worked extremely well.  The issues I have with the stripes are not an eBrush or marker problem, they are a user taping problem.

I intend to coat the entire surf board with a clear gloss of some type.  After all, most surf boards have a nice deep gloss finish.  But, first I need to find out from Spectrum Noir what kind of gloss spray paint is safest for their colors.  I don't want to cause the colors to run just because I want to apply gloss.

Next Step

For the next step, I think I will try some color feathering.  It dawns on me that we can print our own stencils with our 3D printers.  So, I have widened the surf board and created an overlay that will mask the center of the board as I apply color.

I will also go by the local art store and pick up some more appropriate masking tape!

Conclusion

It's very clear to me that we can add value to our 3D prints by using the eBrush airbrush system to colorize them.  While it IS going to take some effort to become an expert with it, I now know that it is well worth the effort.  I also know that it HAS to be a lot easier to use an airbrush system that replies on markers than to try to get the right paint consistency using a traditional airbrush system.  It's also a lot easier to clean up after we're done using it.  All I had to do was throw away the tape and the scap paper used while painting!

Moreover, this is going to be a BIG hit with our cadets (and my grandchildren).  We won't colorize every 3D print; but. just having this capability to use when appropriate is going to be VERY popular with them.   So, the eBrush not only adds value to the print, itself; but, to the class.


Monday, August 15, 2016

Series: Colorizing 3D Prints #1 - Introduction

This is an introduction to a new series that I am planning to write about colorizing our 3D prints.  There are several ways we can accomplish this, like using paints or fingernail polish.  But, I want to go beyond these methods to something I have always wanted to try... air brushing.

Due to my daughter's work with ceramics, we have several traditional air brushes around here.  But, I have always been too intimidated by the need to properly mix the paints or fingernail polishes and the tedious clean-up they require to try them.  Besides, I do NOT consider myself an artist.

I needed something that wasn't so intimidating with which to start.  And, I have found it.

Craftwell eBrush

The eBrush by Craftwell is a unique air brushing system that is able to use MARKERS instead of traditional paint.  Before posting a link, let me warn you to turn down the sound if at work!  The link fires up some lively music.  eBrush Page

The eBrush uses a unique siphoning action to draw ink out of any number of brands of markers.  The best way to introduce it is to show you a video by one of Craftwell's design team.


As you can see, this is a remarkable tool.  I have briefly tested the eBrush using the 3 included Spectrum Noir markers on M3D's ABS-R and Tough 3D Ink.  It works beautifully and dries both quickly and permanently.

Obviously, it's going to take practice to get good at it.  But, how hard will it be?  I don't know yet.

But, I suspect that using Spectrum Noir's color matching system is going to help make it easier.  In any case, easy or tough, you will be along for the ride.  If a non-artist, like me, can use the eBrush to bring some color to my 3D prints then rest assured that you can too. 

Spectrum Noir Marker System

I had never heard of Spectrum Noir markers before receiving 3 of hem with the eBrush system.  The eBrush comes with 6 different adapters that allow it to use other markers, like Copic, Chartpak AD, Prismacolor, Sharpie Fine & Tombow.  But, a little research into the Spectrum Noir series led me to believe that is the brand with which I want to start in earnest.

The reason why I came to that conclusion is that they offer a variety of six pen color packs that range from pale to intense for each matched color set.  For instance, if I am trying to colorize a face from a 3D print make from a 3D scan, I have the benefit of 6 different skin tones to use, which should make it easier to blend colors for facial features.  Moreover, each marker has two tips... one fine point and the other wide.  We should be able to modify and enhance our airbrushed colorization with direct use of the pen's points if needed.  They also have a specific colorless "blending" pen for the task of blending ANY colors together.  Very cool.

While this video shows how to use the Spectrum Noir color system for blending with 2D drawings, I think it is worth watching because it makes it plain to see that we should be able to augment the air brushed results with the two different pen tips in each marker. 


Again, I'm waiting for some color packs to arrive so I can't be definitive as yet.  But, I am confident that having matching color sets with which to work is going to go a long way in helping me get a handle on using the eBrush to successfully colorize my 3D prints.

Things I know Now

The only things I know for sure at this point are:
  • Alcohol based markers work very well with M3D's Tough 3D Ink (flexible) and ABS-R.  I'm assuming the same is true for regular PLA and Chameleon, which should make for some very fun and interesting colorizing possibilities.
  • The eBrush system is a whole lot easier for a novice than a traditional airbrush system would be.  It is not nearly as intimidating.
  • I want to test it with our Z450 powder prints as well as our FDM prints.  I have a feeling that the eBrush can be used to touch up the colors on our prints from 3D scans using the Sense and RealSense scanners, which produce relatively low resolution color maps.

In any case, I think it's going to be a great adventure and one I am looking forward too with great expectations.  Plus, it brings 3D printing closer to the world of crafting... and that, in and of itself, is reason enough to travel down this path and expands the practical applications for 3D printed objects into entirely new areas... like sewing and holiday decorating!

I'm going to ask you to be a bit patient with me.  It may take a little while before the next article in this series appears since I'm going to have to put in some serious practice time and I'm waiting for the Spectrum Noir markers to arrive.    However, while waiting for the Spectrum Noir pens, I might just try my hand at using metallic Sharpies since I can buy them locally.  If so, I'll let you know.

Stay tuned!  :)